There's so much talk of Fulfillment by Amazon (FBA) these days - you just can't ignore it. It’s actually one of the best ways to get more eyeballs on your product on Amazon, and get a higher conversion since FBA'ing your product gives Amazon customers the ability to get their product with 2-day shipping (Prime).
Did you know roughly 70% of FBA sellers reported that their unit sales increased on Amazon.com more than 20% since joining FBA?
1) Improve the effectiveness of your Amazon listing to boost conversions with the same amount of traffic you’re currently receiving.
2) Drive additional traffic to your existing product listing in order to increase sales.
3) Increase the search ranking of your product on Amazon.
4) The pick, pack, and shipping along with customer services is done for you.
5) FBA not only improves your performance-based metrics, but also increases your chances of winning the Buy Box.
But how do you get started with getting your product to Amazon's fulfillment center?
Well, to get you off and running, we've decided to create a step-by-step guide that breaks down creating your first Amazon FBA shipment allowing you to achieve all of the benefits/results that come with it.
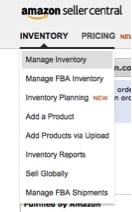
Step 1: Let's keep this simple, sign in to your Seller Account then go to All Inventory View section:
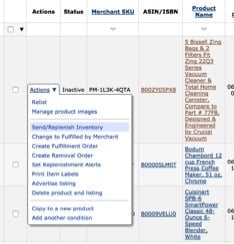
Step 2: Now pick the items that you want Amazon to fulfill by checking the boxes right next to Merchant SKU.
Easy so far, right?
Step 3: Head to the drop down box right above the Merchant SKU's header and choose “Change to Fulfilled by Amazon” then click the Go button.
If your item is already set up for FBA, you will click Send/Replenish Inventory.
Still with us? Much like Extensiv Order Manager this whole process is very much point and click.
Step 4: Clicking the “Convert Only” box will return you to the “All Inventory View” page. From there you can add or remove items at a later time.
Since you’re doing your first shipment w/ FBA (at least we hope you are, otherwise why are you reading this?), click “Convert & Send Inventory”. You can still add items after it is created so don't worry if you miss a few.
If some of your items have never been shipped by Amazon's fulfillment centers you'll be asked to enter the packages dimensions. Click "Save and Continue" once you're done.
We know it's a tedious process, but it'll all be worth it once you start seeing your sales lift.
Step 4 Cont: Experiencing some Déjà vu? No worries you're supposed to be back on the previous window. Click “Convert and Send Inventory” to complete this step.
Step 5: This step is pretty awesome, well not really, but it's necessary.
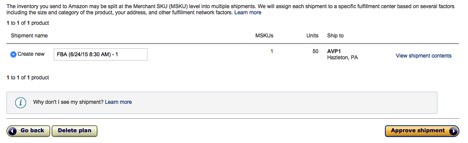
Now you're on the Send/Replenish Inventory Page. Here you can pick your shipping plan, where you're shipping from and your packing type.
Then, choose if you're shipping individual items, or case-packed items.
- Only choose individual items if you're packing together a variety of items in a single box.
- Choose case-packed items if you are packing products that are the same type and condition.
If you go the case-packed route you need to put in the amount of cases and amount per case that you're sending.
Fun stuff right? Again, just think of an average 20% increase in sales on Amazon for your company. Keep pushing forward you're almost there.
Step 6: Here's where you'll add how many units you will be sending and the product dimensions, if none are already provided. If for some reason you messed up and don't want to continue with this plan simply click the Delete Plan button. Once you've put in all of your information click continue.
Step 7: Is any prep work required for your items? Some items may require applying a label that Amazon gives you to put over the UPC code on your actual product. Click continue once you're done.
Easiest step so far right?
Step 8: Here's where Amazon will tell you if your products need to be labeled. In this example we don't need a label.
Step 8 Cont: If you do need a label you will print the amount needed for your items. Easy concept right?
Here are some Example Labels:
Be sure to put these labels outside of your poly bag, or the box per item.
Step 8 Cont...Still: Now you can review your shipment info.
Step 9: Now that you have approved your shipment you can now edit, and further work on it. This is also where you can download your pack list.
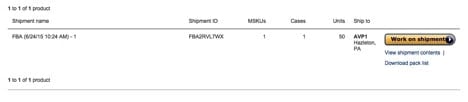
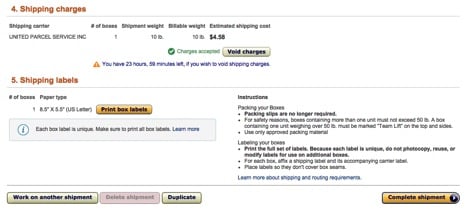
Step 10: Next up is reviewing your shipping contents. Here you can pick your shipping service and the shipment packing details. You will also see your shipping charges on this page and be able to print shipping labels.
There's a good bit of info here, but you're just one step away from dramatically increasing your Amazon sales.
Now you can print out your box labels, which will look like the below sample:
Step 11: Click Complete Your Shipment and have your item picked up by the specific carrier.
You've made it. How do you feel? Hopefully accomplished.
Conclusion
While most of this information is high level for new Amazon sellers the purpose of this post is to show you how to move forward with FBA.
Start small - If you want to run a FBA experiment, start with one product just send a couple items based on your 30-day sell-through. You don't want the product sitting there at Amazon's warehouse.
So, are you excited to see how easy it is to lift your sales 20% by using FBA?
Also, check out our guide to Amazon FBA onsite, a new twist on FBA that Amazon is offering.
We here at Extensiv are always looking to help online sellers better their business and help them make smarter decisions to increase growth.
Work Smart. Sell More.